Showing posts with label craft. Show all posts

Making a Piece of Decor From An Old Cookie Sheet


   Have an old cookie sheet that has seen better days? Before you toss it in the trash, you might be able to turn it into something cute for your home!

   I had an old cookie sheet that was all burnt up and not really something I wanted to continue cooking food on, so instead of throwing it away, I decided to give it a little makeover. With some spray paint, a bow, and a little piece of ribbon, it became a simple piece of hanging decor. 

   All you need for this project is an old cookie sheet, paint (preferable spray paint for easiest application), ribbon, and glue.

   Take the cookie sheet outside or to a well ventilated area and give it a coat or two of spray paint. Depending on the spray paint you're using, you may need more than one coat to get the coverage you want. Just let each coat dry according to the directions on the can.

   I chose a color that would work with my decor, but you could really have fun with this! You could make it white, black, a pretty pastel, metallic, or even a seasonal color.

   Once the paint was completely dry, I used Gorilla Super Glue XL to glue a decorative bow onto the front of the cookie sheet, to give it an extra touch. I then used that glue to add a piece of ribbon onto the back, and secured it with heavy tape, for easy hanging. 

   This was such an easy project and it turned out so cute! It works great for holding fun magnets that can hold up little notes or pictures. I added my previous DIY bottle cap magnets to mine. 


Fun 4th of July Magic Fireworks Activity for Kids


   If you’re looking for a fun 4th of July activity to do with your little ones, check out this easy but entertaining firework magic trick! All you need are just a few supplies: markers, paper towels, scissors, and a container filled with water. 

   Cut pieces of paper towel and fold it over onto itself. Have your little ones draw a simple Star on the front of the paper towel, using black ink. On the underside of the paper towel, have them draw “fireworks” using red and blue ink. Fold the top back over the bottom. Once each piece of paper towel is ready, drop them into the water, star side up, and watch the fireworks “explode”! It happens fast so make sure they’re watching! This activity is fun and simple but little ones love the magic of it!!


Little Gingerbread People Paper Craft For Kids


      Making Crafts during the season of Christmas, is so much fun! 

   An easy one for your little ones, is to make these fun Gingerbread People! For older children, they can draw their own gingerbread, but for younger, you can print off a pre shaped gingerbread character to trace. Use either brown construction paper, a paper store bag, or the packing paper Amazon delivers their gifts in (basically any brown paper you can use for this, but bonus points for repurposing!) and cut out little gingerbread guys. Have them draw designs with white paint or marker, and give them facial features with markers, stickers, beads, glitter ect. This project is so versatile! There are many options you could do to bring the craft to life. 

   Once the front of the gingerbread is dry, flip it over and glue cotton balls on and add glue to the sides, then place another piece of gingerbread cutout on top and smoosh it all together for a puffy gingerbread man! Another option would be to punch holes around the gingerbread siding and have them lace string through the holes to close it up. And if you want to make this activity even more fun, pair it with a good book about Gingerbread men! You could also stuff the gingerbread with little treats or candies, instead of cotton balls… the options are endless and it will look so cute any way they do it!


Making Adorable Ghost Art From A Squeegee


   On behalf of spooky season, it's so much fun to make different crafts surrounding this time of year! So let's grab a squeegee and make the super adorable SqueeGee Ghost! All you need for this is paper, paint, a squeegee, and a marker. I found this idea over at The Craft Train. Mine looks nowhere as cute as there's haha... Feel free to watch their video on how to make these fun lil guys! 

   You begin by using two different colored paints to make the outline of the ghosts head and arms, and use black for the eyes and mouth. I found that it works much better to use black permanent marker for the eyes and mouth, so it doesn’t run paint, like it did on the purple paper one. 

   Start your squeegee at the top and pull it down the paper, to make your ghost! Then take a white marker to outline the ghost and draw in any details you might want, let the paint dry, and it's all ready for display! Pair this craft with a fun book! 

Super cute and great for any age. 


Adorable Acorn Craft For Kids

 
   With Fall here, finding crafts to do with your little ones is easier than ever! 
   Just look around at nature, it provides you with so many ideas and supplies to use, like leaves, twigs, and acorns… add them to things you have on hand around the house and you can come up with some really fun things! Like this little paper bag acorn for example. All you need is a paper bag, some scraps to fill it with (I used ball up newspapers), paint or markers, and a twig! Stuff the bag with scraps, twist it shut, then roll the top down to make an acorn “hat”. Paint or draw the face and hat designs on, glue a twig in the center and your little acorn is complete! Kids will have so much fun making this and designing the faces on their lil acorn. Pair this craft with a cute book like Little Acorn and you will have the perfect Fall afternoon.


Halloween Garland DIY Made From a Recycled Sephora Store Bag

  
  I love to decorate for the holidays, but before I spend money on new items, I like to shop the house to use what I have on hand, or craft up the item I have in mind. This not only saves money, but it’s also more environmentally friendly! I recently made a trip to Sephora for some splurgy beauty products, and had their bag ready to recycle. I thought it would make the perfect striped Halloween Garland, so I gathered the supplies I’d need for the garland, and got to work. 

   I decided to have my garland say “Get Spooky” so I cut out the 9 triangles needed. Then I painted a letter on each triangle, using paint I had on hand, and strung them across some embroidery thread. I folded the tops over and secured them onto the string, using tape. A quick, easy craft, and 
I think it turned out so cute! 


How Every Crafter Can Start Becoming More Eco-Friendly


For the most part, crafting is known for being eco-friendly; it’s all about using what you already have and turning it into something else. Getting around to upcycling even the most simple of things, such as leaves, can be pretty rewarding. While crafting is usually instantly connected with eco-friendly practices, it’s not always like that. Think of craft stores; there are plenty of cheap and single-use plastic items, plenty of foam, which is awful for the environment, and more than enough items that will go straight to the landfill after use. 


So half of the crafting industry is good and working to help the environment, and it’s like there’s this other half that’s working against it. But with that said, wherever you fall in this, there’s always room for improvement, and there’s always room for making positive changes for the world. So, here’s how every crafter can become more eco-friendly!

Always Upcycle and Repurpose When You Can

One of the most eco-friendly approaches to crafting is upcycling and repurposing materials; these are usually done the most when it comes to crafting, so if you’re doing this, then keep up the good work! Before you toss old clothes, furniture, or household items, consider how they can be transformed into something new and exciting. In general, upcycling not only reduces waste but also adds a creative challenge to your crafting. One rule of thumb is to use what you have before buying something else, and if you’re buying something else, get it from the thrift store first (or secondhand) before buying it brand new from a store. 

Focus on More Eco-Friendly Crafts

Not all crafts are eco-friendly; think of faux flower arrangements; those are almost always made from plastic, which isn’t able to decompose, and the floral foam used is harmful to the environment, too. So, instead, switch to real flowers and chicken wire. This is just one example, but there are plenty of crafts out there which isn’t exactly eco-friendly, so it’s best to switch to ones that use little to no waste or are able to easily decompose. 
Just think of stickers, for example. You can make these with your computer (which nowadays doesn’t need much energy to run), and you can focus on printing your own sheet stickers with eco-friendly paper and eco-friendly ink. It’s just a small example, but in general, always look into eco-friendly crafts rather than doing any harmful ones. 

Look into Sustainable Materials

When purchasing materials for your crafts, it’s going to be best to go ahead and opt for sustainable and eco-friendly options. Meaning that you’ll want to look for supplies made from recycled or organic materials. Some great examples would be using hemp, bamboo, organic cotton, and recycled paper, and oftentimes, these can be easily found in craft shops on and offline. 

Avoid Single-Use Plastics

Ideally, try to avoid these at all costs. Unfortunately, there are a lot of single-use plastics when it comes to craft supplies; it’s a bit disheartening in a way. 

Consider the Adhesives You’re Using

Did you know that not all adhesives are environmentally friendly? It seems small, but even this can make a big difference. So, you’re going to want to select eco-friendly glues and adhesives that are non-toxic and water-based. You can just do some research on this and find an affordable brand that works for you. 
 

Making Leaf Creatures A Fun Fall Activity


   Here's a fun Fall activity to do with your little ones! Go for a walk, collect lots of fun different colored leaves, then paint little faces on them. You can make each one look like Owl Leaf Creatures with big eyes and little beaks, or any other animal or monster you desire. Let your kids have lots of fun choosing different shapes and designing their leaf pets. If your leaves are wet, be sure to let them dry out before painting, but just be warned, the leaves will shrivel and fold on you so be quick to paint them :) I just love how they turned out though, so cute and cheery. A perfect Fall craft to do before it rains!


Crafting Up Some Valentine's Day Lollipop Flowers


   A fun and sweet craft to do with your kids, is to make Lollipop Flowers to give out as little Valentines!
 
     To make these, you begin by gathering the "flower" parts, which is cutting hearts and little stems from construction paper. 
 
   You can use glue dots or tape to secure the lollipop onto the papers - the heat for the flower the stems to the stick. These make such cute little candy flowers that would be perfect to give out in a classroom or between family and friends! 
 
♡♡♡

Make a Heart Shaped Paper Clip Bookmark


   After attempting to make Heart Shaped Paper Clip Bookmarks, I realized it was much more difficult than I anticipated! 
 
Probably because I was using tiny paper clips to try this on; I think it would have been much easier with the jumbo clips, but tiny ones are just as cute, if not cuter. 
 
   You have to bend the paper clip from the middle, to form a sort of heart shape, and then it's ready to tuck into your book page! It not only holds your spot, but it looks pretty cute doing so. 
 
♡♡♡

Carved Eraser Stamps For Making Valentine's


   Did you know you can make stamps from a chunky pencil eraser? 
 
   It's better with the right tools, but as long as you have something sharp, you can form a shape into your eraser and use it for stamping. 
 
   I decided to carve a heart shape into my eraser, using only what I had on hand, which happened to be a pair of sewing scissors. It showed to be slightly difficult, but chiseling away at that rubber was kind of therapeutic 😄 Once finished, I inked the heart into paint and began stamping. It's not as pretty as it could be, but it was still fun! You could make these stamps for your kids and let them have tons of fun designing their own Valentine art!


Easy DIY Paper Heart Link Garland for Valentine's Day Decor


   A fun and simple way to decorate for Valentine's Day is by making a Paper Heart Link Garland! You can also turn this into a wreath!


    For this craft, all you need is construction paper, scissors, and a stapler. You can choose any colors you like, but I decided to go with pink and red. To make this Garland, you begin by cutting strips of paper ((about an inch or half in size)), one strip for as many hearts as you think you might need. 
 
   To make a heart, fold a strip of paper in half and press the bottom edge down to form the end of the heart. Then reverse the other two ends, connecting them together to shape a heart, staple the ends and you have your first link! 
 
   Do this as many times as desired to get your perfect length of garland, and once you have each heart done, you can begin connecting them. To do this, you just staple them together, and you're done! You will have an easy yet cute Paper Heart Link Garland that you can decorate with!

DIY Gift Bag From Wrapping Paper


If you need a last minute Gift Bag, but all you have on hand is wrapping paper, and absolutely no calico bags in sight, then check out this simple way to turn paper into a bag that you can gift your presents in!
 

First you will need the supplies... a box (or something square/rectangle shaped), scissors, tape, a glue stick, and your choice of wrapping paper. You begin by cutting the wrapping paper to the size of the box. An ordinary shoe box works great. You fold the paper over on the box, leaving an inch or so of space, and cut the shape of a square or rectangle. 
 
    Once you have your shape, fold about an inch or two of the top over, gluing it down to produce a nice clean look. Then take the paper and wrap it around the box you used, taping the end, while pressing the sides to give a form to the bag. On the end of the bag, wrap it as you would if you were wrapping your box, tape and all. Then slowly pull the box from the bag and it should be complete! 
 
 
   Do some extra creasing on the edges to give it a cleaner look, and for it to stand up better. You can also add handles to the top of your bag. I would suggest putting in a piece of card stock on the bottom of the bag, to give it better support. 
 
 
   Once you get the hang of it, it takes no time to make this bag, so it's great for last second ideas. But if you're only using wrapping paper for this, make sure not to hold heavy items inside. You could attempt to make smaller versions of these bags with construction paper, Newspaper, Chip Bags, and more! 

DIY Christmas Cardboard Gingerbread House Garland


     I'm a big fan of making your own decor so you don't have to store a bunch of stuff, that only gets used once a year. So when I was trying to think of some cute Christmas decorations, I came across the idea to make little Gingerbread Houses. This idea is so easy and it makes a great looking holiday Garland, just using what you have on hand. For this project, I gathered the supplies I needed. Cardboard, scissors, string, and white paint. 
 
   I cut the shapes of houses I wanted, some with rounded roofs, some with pointy ... then I began painting. I gave each house a different design of windows and doors. Once the paint dried, I hung each house onto some string, using mini clothespins I had, but you could also hole punch the tops or just thread some string through. I put the newly made garland on my wall and I'm really pleased with how cute it turned out! And once the season is over, I can either choose to hold on to these little houses for the next year, because they're thin and really take up no space, or I can throw them away and if the desire strikes, I can make them again next year!


Encourage Your Kids to Clean with a DIY Cleaning Bottle


   A fun way to get your kids interested in helping clean, is to let them make their very own all purpose cleaning solution bottle! Take a spray bottle and cut a piece of paper to fit its size, give your kids some markets or crayons and let them create a "label" for their cleaning solution* bottle. I did this years ago with my son, and he really enjoyed it. He drew a photo of Deadpool and completed it with giving his bottle a brand, designing specific details, and even adding its own barcode. Once his art for the label was ready, we used clear packing tape across the entire thing, to keep it protected, and then some to tape the label on. It has withstood use after use, and I think it looks so cute too! 

   *For the all purpose cleaning solution, we made up a mix of vinegar, water, and essential oils. This is great for allowing your kids to clean their bathroom counters all on their own! Or anything else really. It encourages your little ones to keep things clean, and also teaches them how to do so! This is a fantastic project for any age! 


Making Gifts With Glass Bottle Cutting

Disclaimer: I received the following product(s) in exchange for my review. All opinions my own.


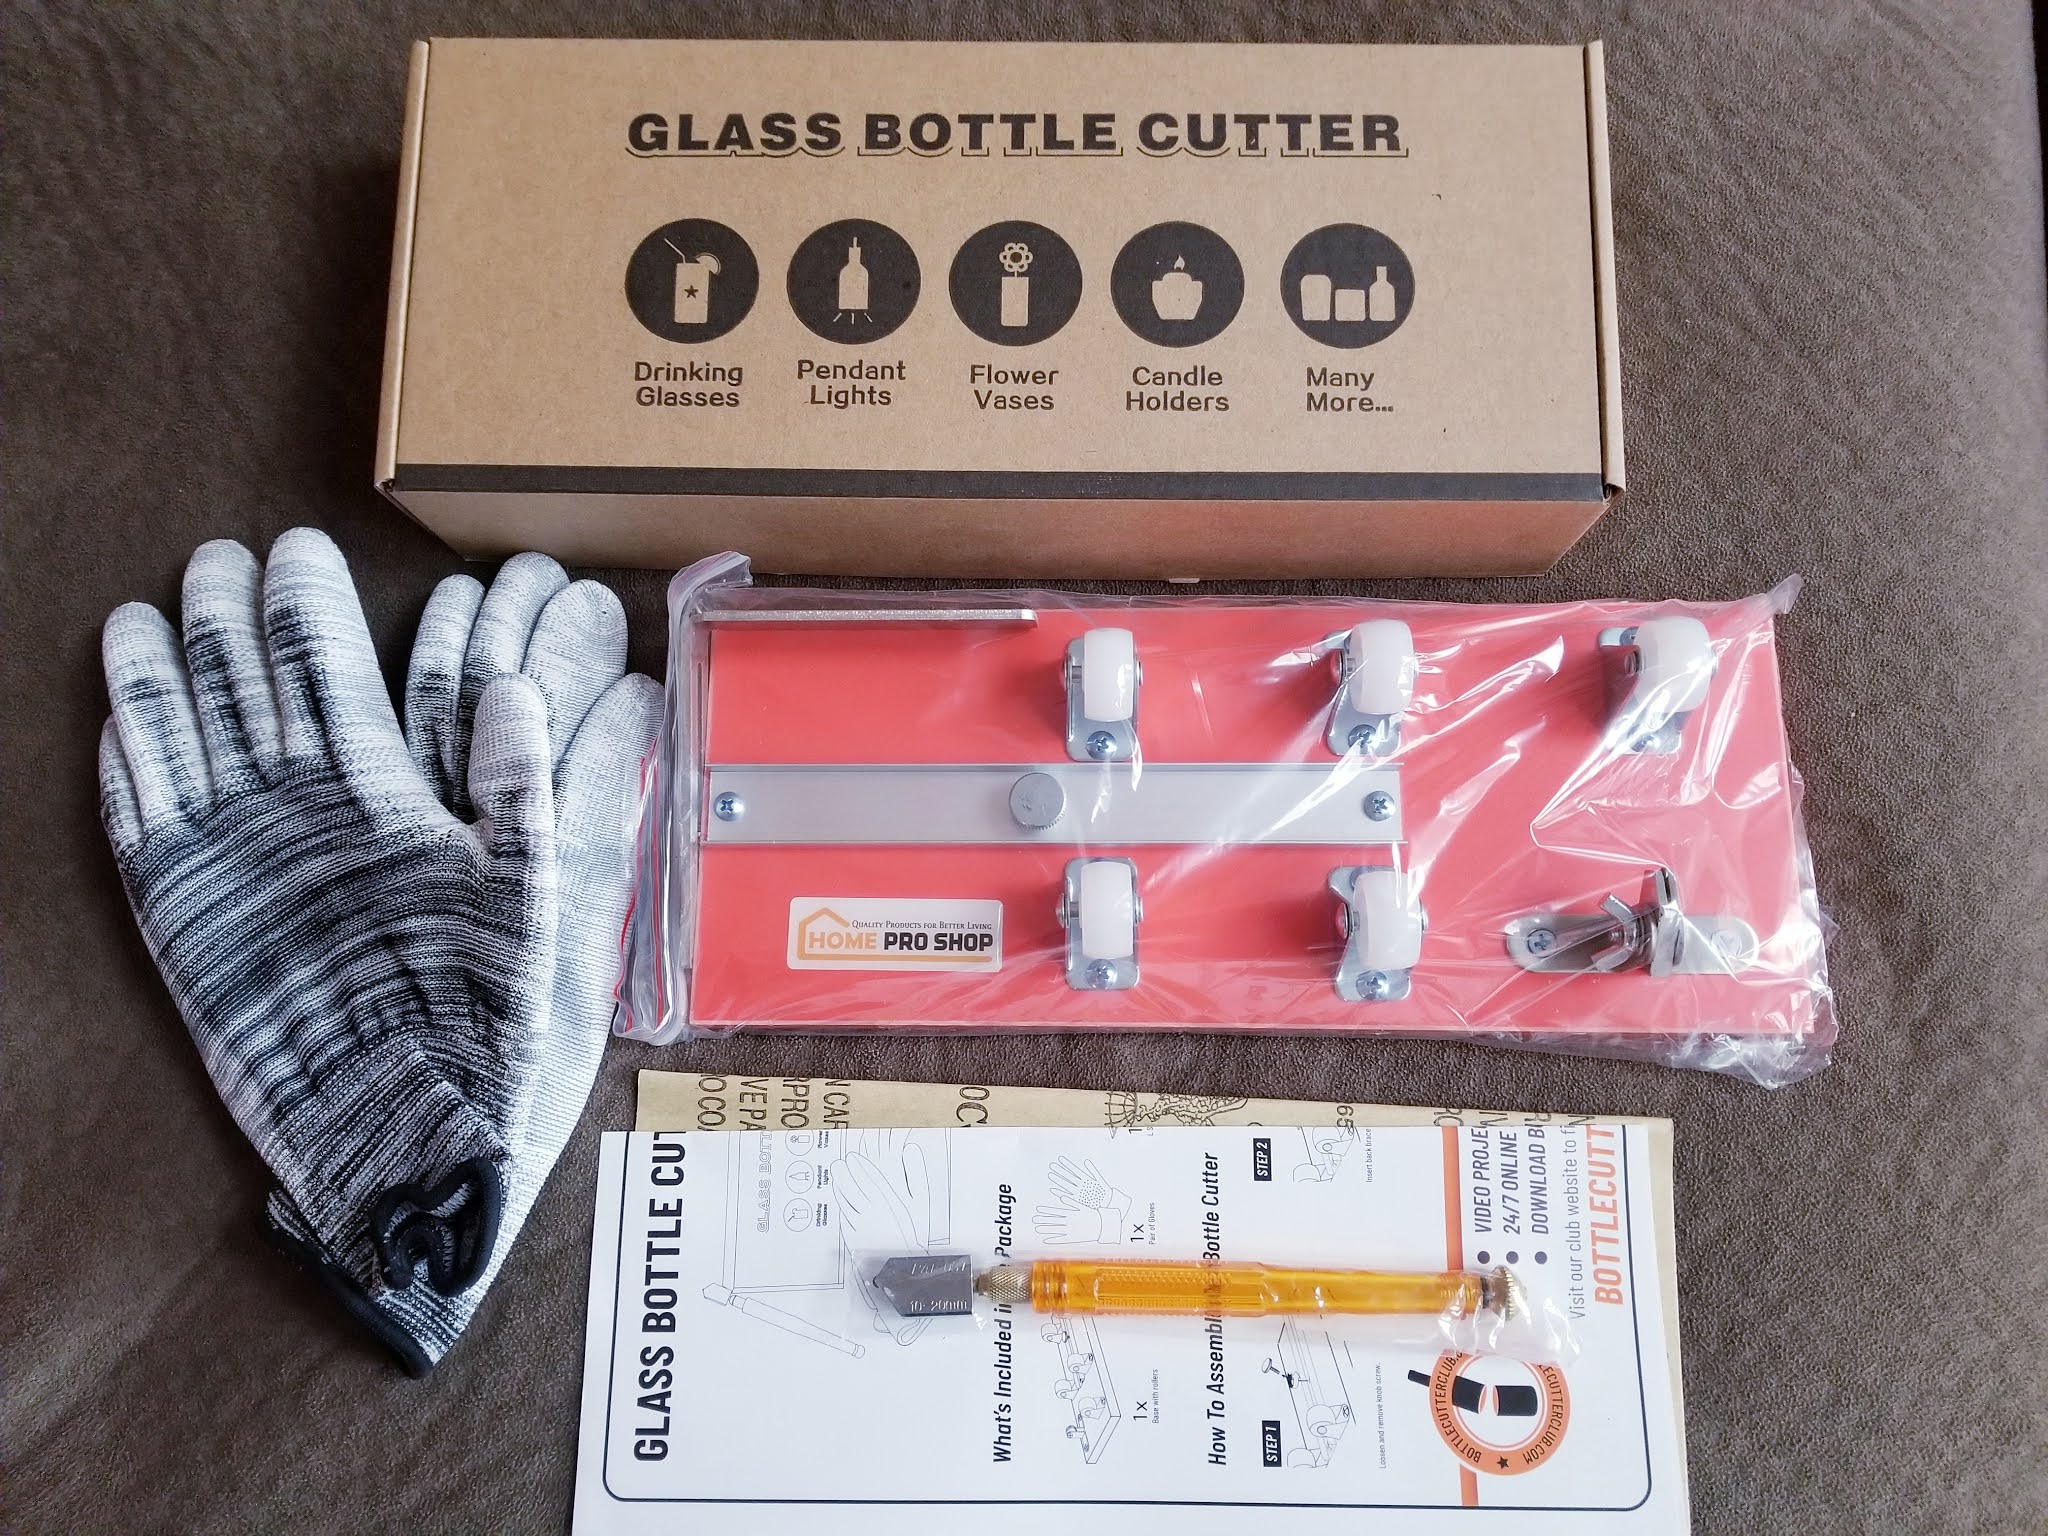
   If you're looking to get into a new hobby, check out Bottle Cutting! There are so many things you can make, from a cut and sanded bottle. Think: Vases, Candle Holders, Pendant Lights, and more!

   I've always been intrigued by bottle cutting and making crafts and gift items with them, so it was pretty exciting to try out one of these pieces of equipment. The box came with everything you need, except the glass bottle(s), the water, and the containers needed to heat and hold said water.  :)
 
 
   I followed directions and scored the bottle where I wanted it cut, then dunked the bottle into hot water, then cool, as needed. It took quite a bit to figure out, as the water temperatures weren't exactly cooperating, but the glass begins cracking in boiling water at 200° and cool at 45°. Unfortunately the cracking continued past the score mark, making it break in the wrong spots. I will have to try it again once I have another bottle available. If it works right, these will turn out so cool and work great for so many different projects!


   You can find this cool Glass Bottle Cutter available on Amazon and it comes with 100% Customer Satisfaction Guarantee and a Lifetime Warranty!
 
 
 I received a complimentary product in exchange for an honest review. All opinions my own.
 

Popsicle Stick Pumpkin Craft


    Fall is a great time for crafting up all the pumpkin, leaf, and cozy things... So why not make this adorable little Popsicle Stick Pumpkin Head! It's easy for all ages and adds an extra cute touch to your Fall decor.

 To make this craft, you need the following supplies:

Glue

Big Googly Eyes

Orange Popsicle Sticks (at least 5)

Green Popsicle Stick (or other item) for the stem


Design your pumpkin head and glue all the pieces in place, let dry, and admire its cuteness!


Edible Peanut Butter Playdough + Recipe


   A fun fall activity for all ages, Edible Peanut Butter Playdough! I remember making this as a kid and loved it! So when I realized I had all the ingredients on hand, I decided I needed to make it! 


To make Edible Peanut Butter Playdough, you need to following ingredients:

1 Cup of Creamy Peanut Butter
2 Cups of Powdered Sugar
About 1/4 Cup of Honey 
(give or take to help it stick together) 
And your choice of (optional) spice. I like to use All Spice or Cinnamon for an extra Fall-like touch :)

   Mix all the ingredients together and begin kneading to form the dough. If it's too sticky, add in a little more powdered sugar, if it's too dry, add in a little bit more honey. Once the dough is perfectly moldable and just right (you will know), it's ready to be played with! Your little ones will love playing with it, and you don't have you worry about if they try to eat it, because it's delicious! 

This fun Peanut Butter Playdough makes excellent little Acorn Treats when you add in extra pieces, such as cereal, pretzels, sprinkles, ect. It's the perfect Fall Fun and Treat all in one!